
Are you tired of your dull and unappealing basement floor? Do you want to increase its durability and aesthetic appeal? Look no further, as this article will teach you all about the benefits and process of epoxy flooring for your basement. Say goodbye to unsightly floors and hello to a durable and stylish solution.
What Is Epoxy Flooring?
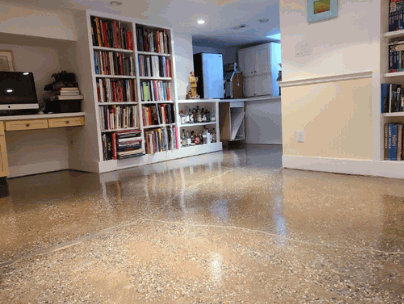
Epoxy flooring is a sturdy and flexible flooring choice that is frequently utilized in basements. It is composed of a resin and a hardener that are combined to create a robust and smooth surface. Epoxy flooring offers a glossy finish that is resistant to stains, chemicals, and moisture. It is also effortless to clean and maintain.
In general, epoxy flooring is a favored option for basements due to its durability, visual appeal, and ability to endure heavy foot traffic.
What Are The Benefits Of Epoxy Flooring?
If you are thinking about remodeling your basement, one option to think about is epoxy flooring. But what are the advantages of this type of flooring? In this section, we will discuss the main reasons why epoxy flooring is a popular choice for basement renovations. We will delve into each benefit, including its durability, easy maintenance, and visual appeal, to assist you in deciding if epoxy flooring is the best option for your basement.
1. Durability
Durability is one of the key benefits of epoxy flooring. Here are the steps to achieve a durable epoxy floor in your basement:
- Prepare the floor by thoroughly cleaning and removing any dirt or debris.
- Repair any cracks or imperfections in the floor surface.
- Apply a primer to ensure proper adhesion of the epoxy coating.
- Mix the epoxy coating according to the manufacturer’s instructions and apply it evenly on the floor.
- Add decorative chips, if desired, to enhance the appearance of the floor.
- Apply a topcoat to protect the epoxy coating and enhance its durability.
By following these steps and taking the necessary safety precautions, such as wearing protective gear and working in a well-ventilated area, you can achieve a durable and long-lasting epoxy floor in your basement. Regular cleaning and maintenance will help preserve its durability over time.
2. Easy Maintenance
Epoxy flooring is known for its easy maintenance, making it a popular choice for basements. Here are the steps to maintaining an epoxy floor in the basement:
- Regular Cleaning and Sweeping: Remove dirt and debris with a broom or vacuum regularly to prevent scratches and damage.
- Avoid Harsh Chemicals: Use mild, pH-neutral cleaners to clean the floor and avoid abrasive cleaning tools.
- Fix Any Damages Immediately: Repair any damages like cracks or chips as soon as possible to prevent further deterioration.
By following these steps, you can ensure that your epoxy floor in the basement remains in excellent condition with minimal effort.
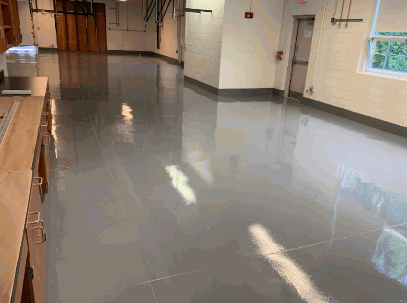
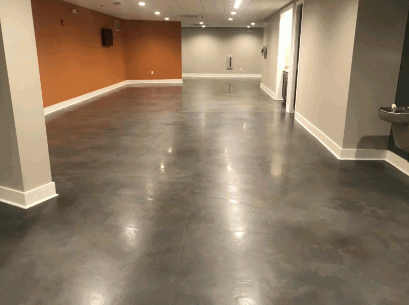
3. Aesthetics
When it comes to epoxy flooring, aesthetics play a crucial role in enhancing the overall look of your basement. Here are some steps to achieve aesthetically pleasing epoxy flooring:
- Prepare the floor by cleaning it thoroughly and removing any existing coatings or sealants.
- Repair any cracks or imperfections in the floor to ensure a smooth surface.
- Apply a primer to promote better adhesion of the epoxy coating.
- Mix the epoxy coating according to the manufacturer’s instructions and apply it evenly on the floor.
- Add decorative chips or flakes to the wet epoxy coating for a customized look.
- Allow the epoxy coating to cure properly before applying a topcoat to enhance its durability and finish.
By following these steps, you can achieve a visually appealing epoxy floor in your basement, transforming it into a more attractive and enjoyable space.
How To Epoxy Floor A Basement?
If you are considering improving your basement flooring, epoxy coating is an excellent choice. However, before you begin, it is important to understand the step-by-step process of how to apply epoxy to a basement floor. In this section, we will provide you with guidance for each stage, starting from preparing the floor to incorporating decorative elements. By the end, you will have a basement floor that is both visually appealing and resistant, making it a practical and fashionable space.
1. Prepare The Floor
Preparing the floor is a crucial step when epoxy flooring a basement. Follow these steps to ensure a successful application:
- Clean the floor thoroughly to remove any dirt, dust, or debris.
- Repair any cracks or imperfections by filling them in with a suitable epoxy filler.
- Etch the floor using an etching solution to create a rough surface for better adhesion.
- Rinse the floor with clean water to remove any residue from the etching solution.
- Allow the floor to dry completely before proceeding.
- Apply a primer to the floor to improve adhesion and prevent moisture issues.
- Let the primer dry according to the manufacturer’s instructions.
By following these steps, you will create a clean and properly prepared surface for epoxy flooring in your basement.
2. Repair Any Cracks Or Imperfections
Repairing cracks and imperfections is an essential step in epoxy flooring for basements. Here is a list of steps to follow:
- Inspect the floor for cracks, chips, or uneven areas.
- Clean the damaged areas using a vacuum or broom to remove debris.
- Use a concrete patching compound to fill in the cracks and smooth out any imperfections.
- Follow the manufacturer’s instructions for mixing and applying the patching compound.
- Allow the compound to dry completely before proceeding to the next step.
- Sand down any rough patches or high spots to ensure an even surface.
- Clean the repaired areas thoroughly to remove any dust or debris.
By following these steps, you can ensure a smooth and flawless epoxy flooring finish in your basement.
3. Clean The Floor Thoroughly
To clean the floor thoroughly before applying epoxy flooring to a basement, follow these steps:
- Remove any furniture or items from the floor.
- Sweep or vacuum the floor to remove any loose debris or dirt.
- Use a mop or sponge with a mild detergent and warm water to scrub the floor.
- Pay extra attention to any stains or grease spots, using a scrub brush if necessary.
- Rinse the floor with clean water to remove any soap residue.
- Dry the floor completely before proceeding with the next steps.
4. Prime The Floor
Before applying epoxy flooring to a basement, it is important to prepare the floor correctly to ensure a strong and long-lasting bond. Follow these steps to prepare the floor:
- Thoroughly clean the floor, removing any dirt, dust, or debris.
- Repair any cracks or imperfections in the floor using a suitable filler.
- Apply a concrete primer evenly across the entire floor surface using a roller or brush.
- Allow the primer to dry according to the manufacturer’s instructions.
- Inspect the primed floor for any missed spots or uneven coverage. Apply a second coat if necessary.
- Make sure the primed floor is completely dry before proceeding with the epoxy coating.
By following these steps and priming the floor properly, you can create a solid base for the epoxy flooring, increasing its durability and lifespan.
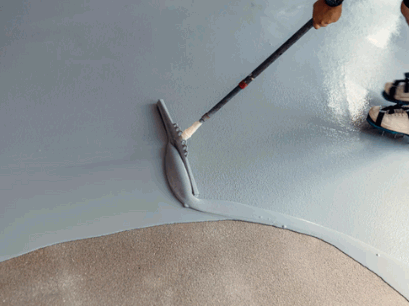
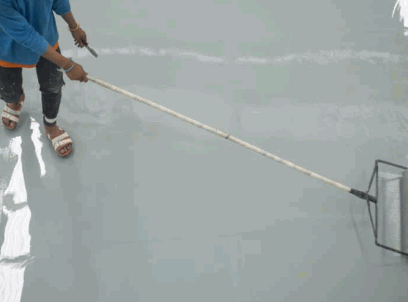
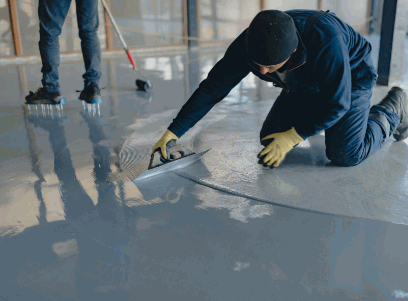
5. Mix And Apply The Epoxy Coating
To properly mix and apply the epoxy coating to your basement floor, follow these steps:
- Follow the manufacturer’s instructions to prepare the epoxy mixture, ensuring the correct ratios of resin and hardener.
- Use a mixing paddle and drill to thoroughly mix the epoxy components for the recommended time.
- Begin applying the epoxy coating in small sections, starting from one end of the floor and working towards the other.
- Use a roller or brush to evenly spread the epoxy, making sure to cover the entire surface.
- Pay attention to edges and corners, ensuring they are properly coated.
- Allow the first coat to cure according to the manufacturer’s instructions before applying a second coat if desired.
- Follow any additional drying and curing time instructions provided by the manufacturer.
By following these steps, you can achieve a smooth and durable epoxy coating for your basement floor.
6. Add Decorative Chips
When epoxy flooring a basement, adding decorative chips is an optional step that can enhance the aesthetic appeal of the floor. Here is a step-by-step guide on how to add decorative chips to an epoxy floor in the basement:
- Prepare the floor by cleaning and ensuring it is smooth and dry.
- Mix the epoxy coating according to the manufacturer’s instructions.
- Apply a thin layer of epoxy to the floor using a roller or squeegee.
- While the epoxy is still wet, sprinkle the decorative chips evenly across the floor.
- Allow the epoxy to cure for the recommended time.
- After the epoxy has cured, scrape off any loose chips and sweep the floor to remove excess chips.
- Apply a topcoat of clear epoxy to seal the chips in place and provide added protection.
By following these steps, you can successfully add decorative chips to your epoxy basement floor, creating a visually appealing and durable surface.
Delve into: Can You Use Epoxy Floor Paint
7. Apply A Topcoat
Applying a topcoat is an optional but recommended step when epoxy flooring a basement. Here is a step-by-step guide:
- Prepare the floor by removing any debris and cleaning it thoroughly.
- Repair any cracks or imperfections using epoxy crack filler.
- Clean the floor again to ensure a smooth surface.
- Prime the floor with epoxy primer to improve adhesion.
- Mix the epoxy coating according to the manufacturer’s instructions.
- Apply the epoxy coating using a roller or brush, working in small sections.
- Apply a top coat to enhance durability and add a glossy finish. (Optional)
What Are The Safety Precautions To Follow When Epoxy Flooring A Basement?
Before undertaking the process of applying epoxy flooring to a basement, it is vital to comprehend the safety precautions that must be followed. This project can be hazardous if the necessary measures are not taken, due to the use of chemicals and the potential for fumes. In this section, we will discuss the essential safety precautions that need to be taken in order to guarantee a safe and successful epoxy flooring experience. From wearing protective equipment to following the manufacturer’s instructions, we will cover all the important steps to be taken prior to starting the project.
1. Wear Protective Gear
When epoxy flooring a basement, it is crucial to prioritize safety and wear protective gear. Here is a list of steps to follow:
- Gather the necessary protective gear, such as gloves, safety goggles, and a respirator mask.
- Ensure proper ventilation in the basement by opening windows or using fans.
- Read and carefully follow the manufacturer’s instructions for handling and applying the epoxy coating.
Taking these precautions will minimize the risk of exposure to harmful fumes and potential skin irritation.
2. Work In A Well-Ventilated Area
Working in a well-ventilated area is essential when epoxy flooring a basement to ensure safety and minimize health risks.
- Open windows and doors to promote airflow.
- Use fans or ventilation systems to increase air circulation.
- Wear a respirator or mask to protect against fumes.
- Avoid working in confined spaces without proper ventilation.
- Follow the manufacturer’s instructions for ventilation requirements.
- Take regular breaks in fresh air to prevent overexposure.
3. Follow Manufacturer’s Instructions
To ensure a successful epoxy flooring project in your basement, it is crucial to follow the manufacturer’s instructions carefully. Here are the steps to follow:
- Prepare the floor by cleaning it thoroughly and removing any existing coatings.
- Repair any cracks or imperfections in the floor using a suitable epoxy filler.
- Follow the manufacturer’s instructions for mixing the epoxy coating, making sure to use the correct ratios.
- Apply the epoxy coating evenly onto the floor using a roller or brush, following the recommended application thickness.
- If desired, add decorative chips to the wet epoxy surface to enhance its appearance.
- Allow the epoxy coating to cure according to the manufacturer’s instructions, ensuring proper ventilation throughout the process.
- Once cured, apply a topcoat for added durability and protection.
By following these steps and adhering to the manufacturer’s instructions, you can achieve a professional-looking and long-lasting epoxy floor in your basement.
How To Maintain An Epoxy Floor In The Basement?
If you have an epoxy floor in your basement, you know how important it is to maintain it properly. Neglecting to care for your epoxy floor can lead to unsightly and potentially costly damages. In this section, we will discuss the necessary steps to maintain your epoxy floor in the basement. From regular cleaning and sweeping to avoiding harsh chemicals and promptly fixing any damages, these tips will help keep your epoxy floor looking pristine for years to come.
1. Regular Cleaning And Sweeping
Regular cleaning and sweeping are essential for maintaining an epoxy floor in the basement. Here are some steps to follow:
- Sweep the floor regularly to remove loose dirt and debris.
- Use a mild detergent mixed with warm water to mop the floor.
- Scrub any stubborn stains gently with a soft-bristle brush.
- Rinse the floor thoroughly with clean water to remove any soap residue.
- Dry the floor completely using a mop or a dry cloth.
- Avoid using harsh chemicals or abrasive cleaning tools that can damage the epoxy coating.
- Address any damages or scratches immediately to prevent further deterioration.
By following these steps, you can keep your epoxy floor in the basement clean and well-maintained, ensuring its longevity and appearance.
2. Avoid Harsh Chemicals
To maintain an epoxy floor in the basement and avoid damaging it, it is important to avoid using harsh chemicals. Here are some steps to follow:
- Use a pH-neutral cleaner specifically designed for epoxy floors.
- Regularly sweep or vacuum the floor to remove dirt and debris.
- Wipe up spills immediately to prevent staining or etching.
- Avoid using abrasive scrub brushes or pads that can scratch the surface.
- Do not use ammonia-based or acidic cleaners, as they can degrade the epoxy coating.
By adhering to these steps, you can ensure the longevity and appearance of your epoxy basement floor.
3. Fix Any Damages Immediately
Fixing damages on an epoxy floor in the basement is crucial to maintaining its durability and appearance. Here are the steps to follow:
- Assess the damages by inspecting the floor for cracks, chips, or any other signs of deterioration.
- Clean the damaged area by removing any debris, dust, or loose particles.
- Repair minor damages by filling cracks or chips with an epoxy filler or patching compound, following the manufacturer’s instructions.
- Smooth the repaired area with a putty knife or sandpaper to ensure it is level with the rest of the floor.
- Clean the repaired area again to remove any residue or dust.
- Apply a new layer of epoxy coating over the repaired area, blending it seamlessly with the surrounding floor.
- Allow the epoxy to cure completely according to the manufacturer’s instructions before using the floor.
By promptly fixing any damages on your epoxy floor, you can prevent further deterioration and maintain its integrity for a longer period of time.


